
This article tells you how to germinate any seed. The magic of seeing a tiny seed grow into a healthy plant never gets old. No matter how experienced you are as a farmer or how excited you are about starting your first garden, seed growth is the most important thing you can do.
But the process can be scary at times because there are so many seeds and what seems like an endless number of techniques. Do not be afraid! This complete guide will give you the information and tools you need to grow any seed, from tiny herbs to big veggies.
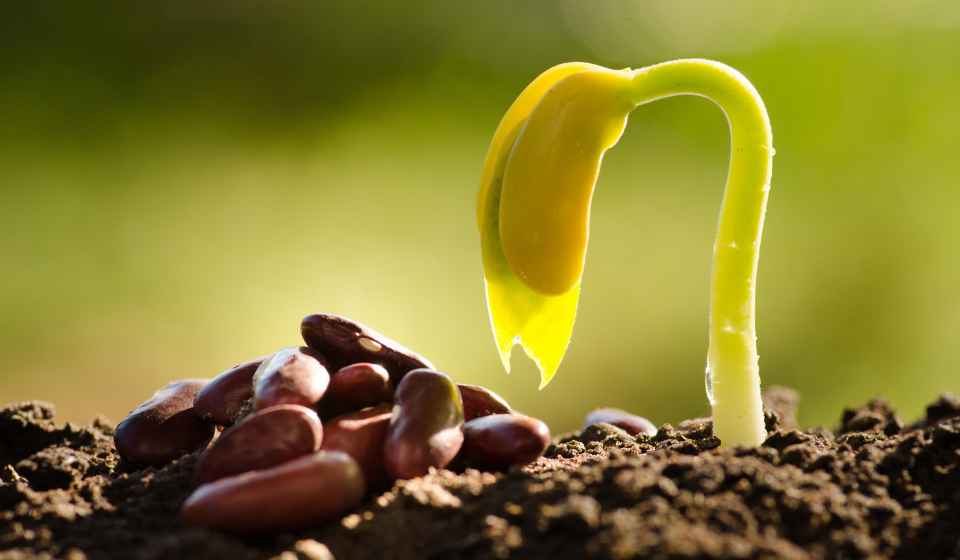
Seed Germination Process
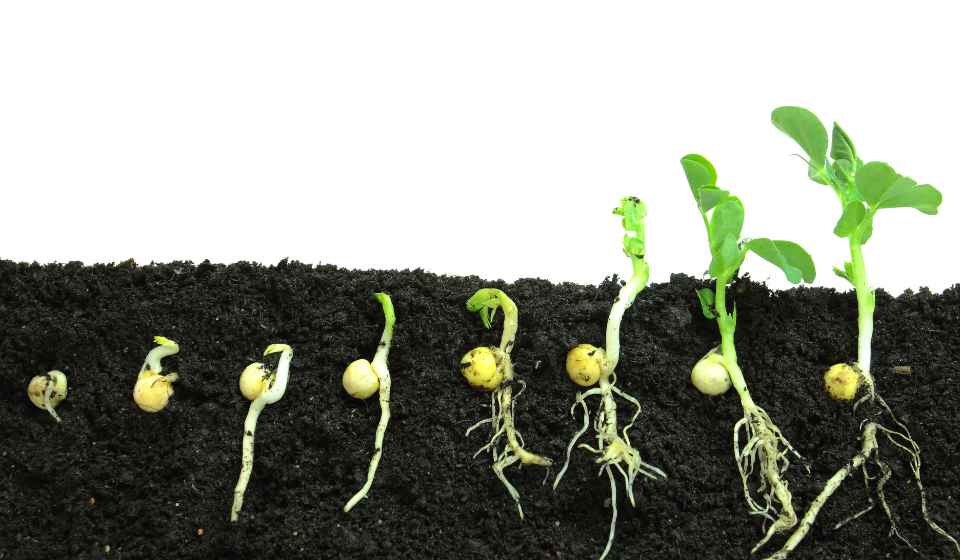
Let’s look at the exciting science behind how seeds germinate before we discuss methods. A seed is basically a dormant potential plant. It has an egg, a kernel (food), and a protective coat. A seed needs three main things to grow: water, warmth, and air.
- Water: Water starts biochemical processes inside the seed, which use enzymes to break down the saved food source and give the baby energy to grow.
- Warmth: Different types of plants need different temperatures to grow, but most seeds do best in a particular range, usually between 60°F and 80°F (15°C to 27°C).
- Oxygen: For seed respiration to work, the saved food must be turned into energy that the plant can use. When these things happen, the seed coat weakens, allowing air and water to reach the baby. The egg then starts to grow and sends out a root, searching for water and a place to stay. Soon after, a shot comes out and moves towards the light.
Also Read; A Complete Guide on Gardening Tool Variations
1. List of Essential Tools for Germination
Here is a more in-depth list of the most essential tools for germination of seeds, along with some extras:
a). Seed Starting Trays or Pots
- Material: The material is plastic, which is cheap, light, and easy to clean. To keep them from getting wet, look for trays with holes for drainage.
- Biodegradable pots, like clay or coir pots, are better for the environment and can be put right into the garden bed when the seeds are ready. This keeps them from being too shocked by the move.
- Size: To start many seeds simultaneously, shallow plates with many cells work best. Individual pots give you more control over how much water you use and make it easy to move plants later. Pick pots that are the right size for the plant when it’s fully grown.
b). Seed Starting Mix
- Pros: The seed starting mix is specially made for plants; it has the proper nutrients, drainage, and airflow for the best sprouting and early growth. It’s germ-free, so damping-off sickness isn’t likely to happen.
- Other options: You can make your seed starting mix by mixing sterile potting mix, perlite (which helps water drain), and soil. However, this requires more work and might not be as reliable as a ready-mixed choice.
c). Watering can or spray bottle
- Watering Can: If you use a watering can, pick one with a soft rose attachment to spray a fine mist that doesn’t hurt the seeds.
- Spray Bottle: This is a valuable tool for misting the soil’s surface and keeping it wet, especially for easily damaged seeds.
d). Humidity Dome or Plastic Wrap:
- Function: It makes a small shelter around the seeds, keeping the wetness in and helping them grow.
- Other Options: Put a clear plastic bag over the jar and loosely wrap it around it for the same result. Make sure there is airflow by poking a few small holes in the plastic.
e). Heat Mat (Extra)
- Benefits: It gives off gentle bottom heat, which is essential for seeds that need warm temperatures to germinate, such as peppers, eggplants, and tomatoes.
- Features: Look for a heat mat with a timer to control the temperature and keep you from getting too hot.
f). Plant Labels
- Material: Labels made of plastic or wood last long and can be used repeatedly. Eco-friendly options include markers made from plant matter that break down over time.
- Information: Write the type of plant on the pots or trays, the date you planted it, and any other notes you want to add, like “thin to 4 inches apart.” This lets you keep track of your seeds and what they need.
g). Extra Tools (optional)
- Grow lights: If there isn’t a lot of natural light where you live, you can buy grow lights to give seedlings the light they need to succeed healthily.
- Seed Depth Marker: This helpful tool helps you plant seeds at the correct depth, which is essential for them to germinate.
- Seed Spreader: This tool helps spread tiny seeds evenly on the growing medium.
- Plant Mister: A mister with a fine tip lets you water plants precisely without moving the dirt.
With these tools, you’ll be ready to start seed sprouting and see how amazing it is for tiny seeds to grow into healthy plants!
Also Read: How To Do Raised Bed Gardening?
2. Selection of Right Seed Germination Method
The straight planting method and the seed starting method are the two main ways to get seeds to grow. What works best depends on the plant type, the weather, and when you want to put it.
2.1. Direct Sowing Method
For this method, you put seeds right into a garden bed made outside after the risk of frost has passed and the soil has warmed up enough. This method works for seeds of plants that don’t like being moved around, like radishes, carrots, and beets.
Here is a more thorough list of the steps you need to take to get your garden bed ready and plant seeds outside:
i). Prepare Your Garden Bed:
- Timing: Plant seeds outside after the risk of frost has passed and the dirt has warmed up enough for the type of plant you are growing. Read the directions on the seed packet or look at a planting calendar for your area.
- Loosening the Soil: Use a rake or yard fork to break up packed-down soil to make an open, fine tilth. This allows roots to grow, air to flow, and water to drain.
- Getting Rid of Weeds and Other Garbage: Remove any weeds, garbage, or useless plants in the growing area. Weeds take water and food from your plants, slowing their growth.
- Improving the Soil (Optional): If your soil isn’t perfect, you might want to improve it by adding organic matter like worm castings, compost, or old dung. This makes the earth more fertile, better at draining water, and better at holding water, making it better for seeds and plants to grow.
- Testing the soil pH (optional): Some plants need a certain pH level in the dirt to grow best. Do an easy soil test to determine your soil’s pH and make necessary changes. Most garden centers sell soil test tools.
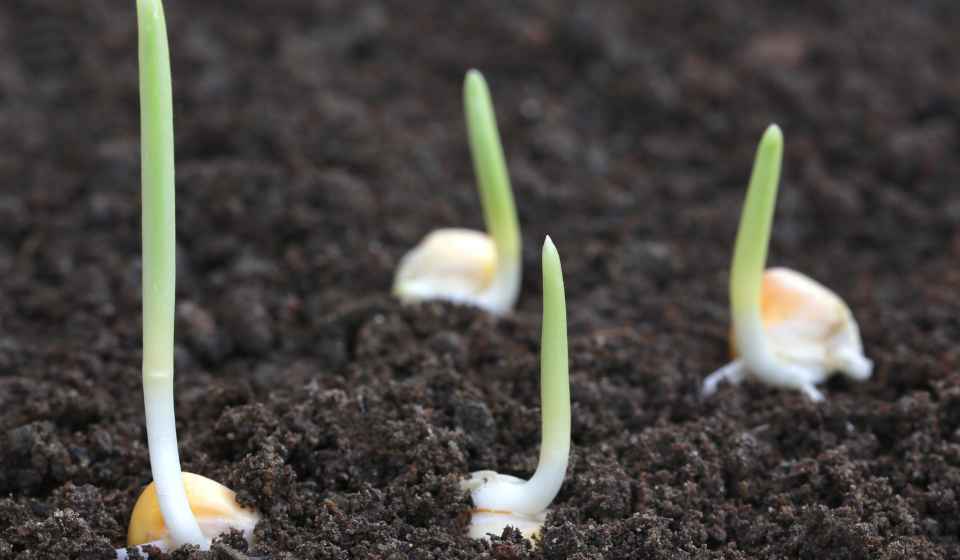
ii). Sow Seeds at the Recommended Depth:
- Instructions on the Seed Packet: Most seed packs provide specific information on how deep to plant each type. This is very important because planting too profoundly can stop seeds from germinating or hurt plants while planting too short can leave them open to drying out or temperature changes.
- General Rule: As a general rule, plant seeds two times as deep as they are wide. Suppose you plant 1/4 inch (0.6 cm) thick seeds and 1/2 inch (1.2 cm) deep.
- Making Planting Furrows (Optional): If you’re planting more giant seeds in rows, use a rake or hoe to make small furrows in the dirt at the distances suggested on the seed box. This makes it easier to put seeds at the right level and keep the rows straight.
Space Seeds the Right Way: - Recommendations on the Seed Packet: The directions on the seed packet usually say how far apart plants should be when they are fully grown. This spacing allows air to flow properly, keeps things from getting too crowded, and ensures that each plant gets enough water, sunlight, and nutrients to grow well.
- Thoughts on Spacing: Different plants need very different amounts of space between them. For instance, lettuce seeds are planted a lot closer together than tomato seeds.
- Thin Seedlings: Once seedlings emerge and develop their first real leaves, you’ll probably need to separate them as much as the instructions say. This ensures that the leftover plants grow healthy. Look at the “Thinning Seedlings” part in the main piece for exact steps.
iii). Use soft water:
- Watering Thoroughly: Once you’ve planted your seeds, use a gentle spray or stream to water the whole area well without disturbing the seeds. The goal is to properly wet the earth without removing the seeds.
- Keeping the Soil Wet: Water your seeds regularly, especially when it’s dry outside, so the soil stays wet but not soggy. How often you water will depend on the weather, the type of dirt you have, and how much sunshine the plants get.
By carefully following these steps, you’ll make your garden bed a good place for seeds to grow and sprout. Remember that monitoring your plants and changing how much you water them as needed is very important for their continued growth and success.
Also Read: Best Tips To Do Container Gardening
2.2. Seed Starting Method:
The seed-starting method lets you get a head start on the growing season by starting seeds indoors in a controlled environment. This method works best for plants that need a long growing season, plants that don’t like being frosty, or plants that do better when moving.
To give you a better idea of the steps in the seed-starting method, here they are:
i). Put wet seed starting mix in your seed starting trays or pots:
- Adding Water to the Mix: Put the seed starting mix into the jar. It should be light and fluffy, so don’t pack it down too much. Slowly and evenly pour water over the mix until it’s completely wet but not dripping. When you squeeze the mix, a few drops of water should come out but not fall apart.
- Leveling the Surface: Gently tap the container on the table to settle the mix and create a flat surface for planting seeds.
ii). Plant seeds at the correct depth:
Instructions on the Seed Packet: Most seed packs provide specific information on how deep to plant each type. This is very important because planting too profoundly can stop seeds from germinating or hurt plants while planting too short can leave them open to drying out or temperature changes.
Planting Method: There are two popular ways to plant seeds; plant each one at the right level for more giant seeds in its cell or pot. This is called “single sowing.” A dibber or your finger can be used to make a small hole. Then, put the seed in the hole and carefully cover it with the seed starting mix.
When you want to spread tiny seeds, sprinkle them evenly over the wet surface of the seed starting mix. Press the seeds into the mix gently with your fingers or a flat tool to ensure they grip the soil well. Do not plant the seeds too deeply.
iii). Water the plant gently with a spray bottle or a watering can that has a rose attachment:
- Why gentle watering is essential: Don’t use a strong stream of water after planting seeds that could wash them away.
- Spray Bottle: Use a spray bottle with a fine mist setting to lightly water the earth around the seeds without having to move them.
- Watering Can: If you use a watering can, add a rose adapter to spread out the water flow and stop it from spraying too hard. Spread water over the surface until the mix is wet but not soaked.
iv). To keep the moisture in, cover the container with clear plastic wrap or a humidity dome:
- Making a Mini-Greenhouse: A humidity dome or clear plastic wrap helps keep the wetness around the seeds, making the area feel like a greenhouse and helping the seeds sprout. This is especially important for seeds that need a lot of air to grow.
- Ventilation Holes (Optional): If you’re using plastic wrap, use a stick to make a few small holes so air can flow and stop condensation from building up, which can lead to fungal diseases. Most humidity caps have air holes built right in.
v). Put the container somewhere warm with bright outside light:
- Requirements for Temperature: Different plants need different temperatures to germinate properly. Read the directions on the seed box to find out what temperature range is best for your seeds. You can also use a heat mat to help germinate seeds that need warm dirt.
- Lighting Needs: For healthy growth, seedlings need a lot of light. Put the jar somewhere that gets bright, indirect sunlight. A sunny bench works well most of the time, but keep plants out of full afternoon sun because it can burn them.
- Other Light Options: Use grow lights a few inches above the pot if you don’t have a sunny spot. Grow lights give plants the intense light they need to succeed healthily.
vi). Keep the soil consistently moist; check it daily and mist or water lightly as needed.
- Checking the Levels of Moisture: Seedlings do best in reliably damp but not wet dirt. Every day, stick your finger into the dirt to check it. If the top feels dry, use a spray bottle or watering can with a rose clip to water it.
- Don’t water too much: Too much water can kill plants and cause root rot. It’s better to be a little underwater than too deep.
vii). When the seedlings arise, remove the plastic wrap or humidity dome to let in more airflow.
Light and air are essential: When the seedlings sprout and get their first true leaves, remove the plastic wrap or humidity dome to let in more airflow. This keeps fungus diseases away and helps plants grow strong and healthy.
Thing Seedlings (Optional): If you plant seeds close together, you may need to thin them after they get their first true leaves. See the directions on the seed box for how far apart plants should be when fully grown. In the main piece, you can read about different ways to thin.
By carefully following these steps and ensuring your seeds have the right conditions, you’ll improve their chances of germinating and growing healthy sprouts that are ready to be moved outside (if necessary) or kept growing indoors.
Remember that by observing thin plants, you can do one of two things:
Thin with Scissors: Cut off plants you don’t want at the soil line with clean, sharp scissors. This method works great for seedlings that are a little weak or when you want to save some of the thinned plants to move to another spot.
Thin by Pulling: Grab the plant you don’t want at the stem’s base and pull it straight up. This method is faster, but be careful not to upset the plants’ roots.
Let plants get used to the outdoors before moving outside (if necessary). Allow your plants to get used to being outside slowly for a week or two before moving them to the garden bed. This helps them get used to temperature, wind, and sunshine changes. Take them outside for more extended periods every day, starting in a shady spot and moving them to a place with more direct sunlight as the days go on.
Also Read: A Guide To Grow Spinach In Pots
3. More Seed Germination Tips for Success
Here’s a more in-depth look at the tips that were given to help your seeds germinate:
i). Pick Good Seeds:
- Freshness Is Important: Choose fresh seeds from a reliable source. New seeds are more likely to sprout than earlier seeds that may not be as healthy. Look for seeds that say the year on the box, either now or last year.
- Heritage vs. Hybrid: Think about what you want. When you save seeds from your catch and plant them, they will grow into plants that are true to type. Hybrid seeds often grow vigorous plants with specific traits that people want, but the next generation may not be the same as those from the seeds.
ii). Pay attention to how you store seeds:
- Cool, dark, and dry: Keep extra seeds in their original packs in a cool, dry place. A basement, closet, or open garage are all good choices if they don’t get too wet or experience big weather changes.
- Moisture Enemy: Water can hurt seeds and make them less likely to grow. Make sure there is no moisture or mist in the storage area.
- Things to think about when it comes to temperature: the best temperatures can be different, but in general, you should store things between 40°F and 50°F (4°C and 10°C). During the summer, don’t keep seeds in hot attics or sheds.
iii). Soak the seeds ahead of time (optional):
- Softening the Seed Coat: Soaking the seeds ahead of time can help seeds with hard shells, like beans, peas, and some herbs. Soaking softens the coat, making it easier for water to get through, and speeds up the sprouting process.
- How long to soak: The instructions on the seed box will tell you how long to soak the seeds first. It depends on the type of seed and whether it needs to soak for a few hours or overnight.
- Warm water is best: Soak in warm water, about 80°F (27°C). Cooler water might not work as well.
iv). Make sure there is enough light:
- Light is essential: seedlings need enough light to thrive. Seedlings that don’t get enough light can become weak and long.
- Sunny ledge (Best): A sunny ledge is the best place for seed-starting pots. However, don’t put plants in full noon sun, as it can burn them.
- Turn the Containers: By turning the containers regularly, ensure that all sides of the seeds get enough light and grow straight.
- Grow lights (Alternative): If you don’t have a sunny spot, you could put grow lights a few inches above the pot. Grow lights give plants the intense light they need to grow healthy. Pick lights that give plants all the colors they need to succeed.
v). Use less fertilizer.
- Seedlings Have Reserves: Seedlings have food stored in the seed to keep them going during the early stages of growth. It’s not necessary to use a lot of fertilizer during sprouting.
- Light feeding after true leaves appear: Once plants get their first true leaves (not the cotyledons), you can give them a diluted liquid fertilizer once or twice a week, as long as you follow the directions and dilution rates on the fertilizer box. Young plants can be hurt by too much fertilizer.
vi). Check the temperature:
- Optimal Range: Different types of plants need different temperatures for best sprouting. For most seeds to sprout, a temperature range of 60 to 80°F (15 to 27°C) is usually best. Directions on the Seedbox: The best temperature range for your seeds can be found on the box.
- Heat mat (optional): A heat mat can be useful for seeds like tomatoes, peppers, and eggplants that like it warm to sprout.
vii). Be Patient:
- Times for Germination Vary: Seeds can take a wide range of times to grow, depending on the type of plant, the temperature, and other factors. Some seeds can sprout in days, while others can take weeks.
- Don’t Give Up Too Soon: If plants don’t show up immediately, don’t give up. Keep the temperature and wetness levels stable, and be patient.
- Seed Viability Check (Optional): You can do an easy viability check on the seeds if they haven’t grown after an acceptable amount of time based on the variety’s predicted sprouting period. Pick out a few seeds slowly to check if they are hard or soft and rotten. Firm seeds might still grow, but smooth, rotten seeds probably won’t be able to.
Following these extra tips and ensuring your seeds are in the right conditions will significantly improve your chances of germinating. It’s fantastic to see tiny seeds grow into healthy plants. Remember that these tips and a little practice will get you very far.
Also Read; Top 10 DIY Gardening Tools
How to Fix Problems with Seed Germination
Problems with sprouting can happen even when everything is planned out perfectly. Here are some easy ways to fix common issues:
The seed didn’t grow: This could be because the seeds were planted too deeply, there wasn’t enough water, or the temperature wasn’t right. Make sure you put your seeds at the correct depth, and if you need to, change how much you water them or use a heat mat.
Damping-off is a fungal disease that weakens plants, rot, and dies. Don’t water too much, and make sure air can flow well. If damping-off keeps happening, consider using a pesticide.
Seedlings that are too tall are caused by a lack of light. You can move your plants closer to a light source or leave them in the sunlight for extended periods.
Conclusion
If you practice and use what you’ve learned here, you’ll be well on your way to successfully sprouting any seed and growing plants from scratch. Remember that planting is a process of learning and trying new things.
Don’t be afraid to try new things, and enjoy the thrill of seeing seeds grow into a bumper crop!
Recent Posts
Here is reply of high-demand removable wallpapers. The wallpaper industry has changed a lot in recent times, with the launch of removable wallpaper being seen as a blessing for homeowners, renters,...
Brown is an often neglected color when considering interior design but brown decor living room ideas could make your house feel warm, sophisticated, and timeless. More adaptable than any other...